Welcome to Siit 👋
Siit is a modern company service desk (IT, HR, Legal, Finance, etc) built around three main pylons:
- Integrated: powered by data from your HRIS or Identity Management System and natively connected to your employees’ main communication channels (Slack or Microsoft Teams).
- Automated: designed to simplify processes and connect them seamlessly.
- AI-empowered (available on the Pro plan): our AI features make request handling faster and smarter (AI Assist or AI Agent).
This guide will walk you through the full lifecycle of handling a request in Siit — from its creation to its resolution.
1. Discovering the Requests section
When you log in as an admin, your main workspace is the Request section where you can manage your requests views and handle the request properly.

From this view you can:
- See all incoming requests.
- Organize them into custom views using filters (per service, tag, requester’s office location, etc.).
Managing your views:

Tip: Use “All Views” to rename, reorder, or delete views so your dashboard always matches your scope.
Why Views matter
Think of Views as your personal focus board inside the Siit dashboard.
By configuring your own Views, you can cut through the noise and keep your attention on the requests that matter most to you. Each View is shaped by the filters you apply (e.g. service, tag, requester’s location, priority, or inbox).
This way, instead of working from a long list of mixed requests, you’ll always have a clear, customized board that matches your scope and priorities — helping you stay efficient and organized.
- Switch between List View and Board View (Kanban) depending on your preference.
- Customize columns to show or hide the information you care most about.

2. Understanding Request section columns at a glance
From the Request View, each request line shows key details such as:
- Request subject
- Requester name
- Service associated
- Source channel (Slack, Teams, Email)
- Status & priority
- Tags & inbox
- Primary assignee

Tip: each column can be edited manually or in bulk via the banner at the bottom of the page. You can also access the quick action menu via the right click on a single request. With that you could easily reassign the request, change its title or copy the REQ ID or Link if you need to share it with a teammate.
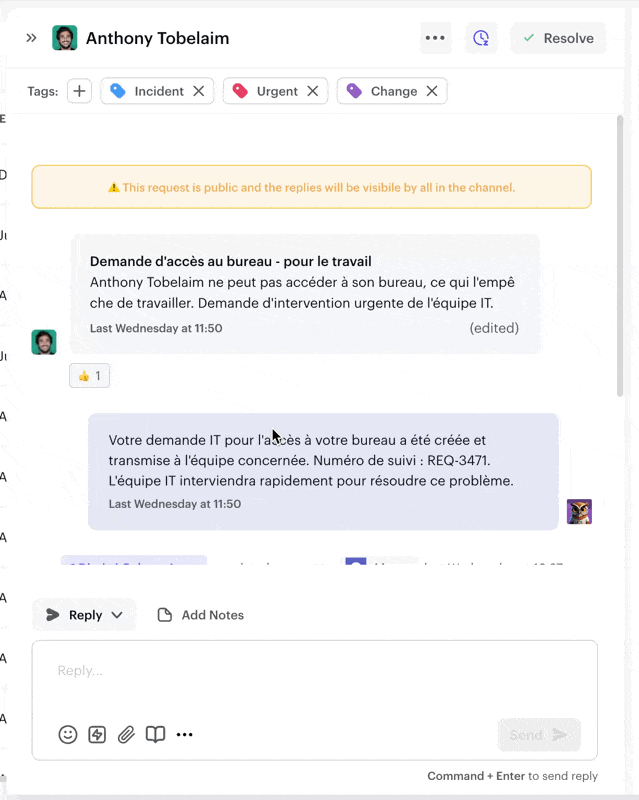
3. Opening a Request
Click on a request to access the Request Window. This is divided into:
- Right-side panel (request details & employee context)
- Central part (conversation & actions)

Let's review it step by step.
3.1. The Right-Side Panel (Request Details & Employee Information)
Here you can view and update:
Request details (status, priority, inbox, assignee, services, SLA, etc.)Note: Assignees can only be selected among admins in the current inbox. To assign to an admin from another inbox, first switch the inbox.

- Followers:
The Follower feature lets you bring the right people into a request without changing the main assignee.
- Employees as followers: you can add any employee who needs visibility on a request. They’ll be notified directly in Slack or Teams and will have access to the request details. If relevant, they can also interact in the conversation.
- Admins as followers: useful when an admin needs to collaborate or monitor a request that sits in an inbox they’re not officially assigned to.
In short, followers ensure everyone who should be in the loop is kept informed, without disrupting ownership of the request.
- Requester information (synced from HRIS/IdM): job title, department, office, manager (useful for sending manual approvals).
- Employee applications & equipment (if synced). IT admins can see tools, apps, and devices that belongs to the employee. Some integrations (e.g., JAMF, JumpCloud) allow quick actions here.

3.2. The Central Request panel
This is where most request handling happens:
- Conversation thread: employee’s request, forms replies, and your replies.
- Automation events: automatic actions triggered by your configuration, those can also be hidden if needed.
- Qualification and actions at the top: add tags, snooze, edit the request title, resolve etc
- Reply actions at the bottom:
- Reply to the employee
- Send a manual approval
- Leave an internal note (visible only to admins)
4. Closing the Request
Once the request has been handled:
- Click Resolve (top-right corner).
- The employee will be notified, and the request will be marked as closed and you will be able to retrieve it in your Closed view.

That’s it!
You’ve now followed a full Request Management Flow in Siit — from opening to closing a request!