About this article
In this article, we’ll review how to configure a playbook that fully automates app access requests — from the initial submission by an employee to the final provisioning of the application via Okta, JumpCloud, Google Workspace, Microsoft Entra ID or a custom webhook integration.
By the end of this guide, you’ll be able to build a zero-touch access request flow that:
-
Automatically routes the request for the right approvals
-
Approval chains (e.g., manager and app owner)
-
Provisions the access once approved
-
Updates the ticket automatically once completed
App provisioning is one of the most frequent — and repetitive — IT requests.
The App Provisioning playbook enables the AI Agent to handle these automatically, from qualification to action, in full auto-pilot mode.
What It Can Do
With a properly configured playbook, the AI Agent can:
-
Qualify the request — ask for the app name and required permission level.
-
Check eligibility — validate department rules or available licenses.
-
Request approval — automatically notify the manager or app owner if needed.
-
Execute the action — add the user to the right group in Okta, JumpCloud, or directly provision the license.
-
Confirm resolution — notify the employee once access is granted.
If automation fails, the Agent automatically creates a standard request for IT to follow up — ensuring no interruption.
Why It’s Useful
-
Frees IT teams from repetitive provisioning tasks.
-
Gives employees faster access to the tools they need.
-
Ensures governance and approval flows are respected.
Example in Action
Employee: “I need access to Figma.”
AI Agent → “Got it! What level of access do you need — Viewer or Editor?”
Employee: “Editor.”
AI Agent → Validates the request, gets approval from the manager, provisions access via Okta, and confirms completion.
✅ Result: App access requests are processed automatically, with full traceability and zero IT manual work.
💡 Best Practices
-
Get clear playbook names "IT request" is not specific enoug. "Okta App Access requests" or "Software access handled in Jumpcloud" is specific enough.
-
If your app group names have the same structure (appname_users, appname.group etc) and a common approval flow, you can use one single playbook to manage all the requests, with clear instruction and guideline for the agent on how the groups are structured.
- If you have specific rules for specific apps, it is recommended to have one dedicated playbook for this specific app with proper instructions and set of actions (including approval).
How to set it up
Before starting, make sure you’ve reviewed the Playbook configuration fundamentals to understand how to create and customize playbooks in Siit.
If your Okta, JumpCloud or Google Workspace integration is connected to Siit, you’ll have access to pre-built templates designed for this use case — look for the playbook named 🔗 Okta – App Provisioning 📲 (among other available templates).


Once you’ve selected this playbook and clicked Use playbook, you can adjust the configuration to match your specific needs.
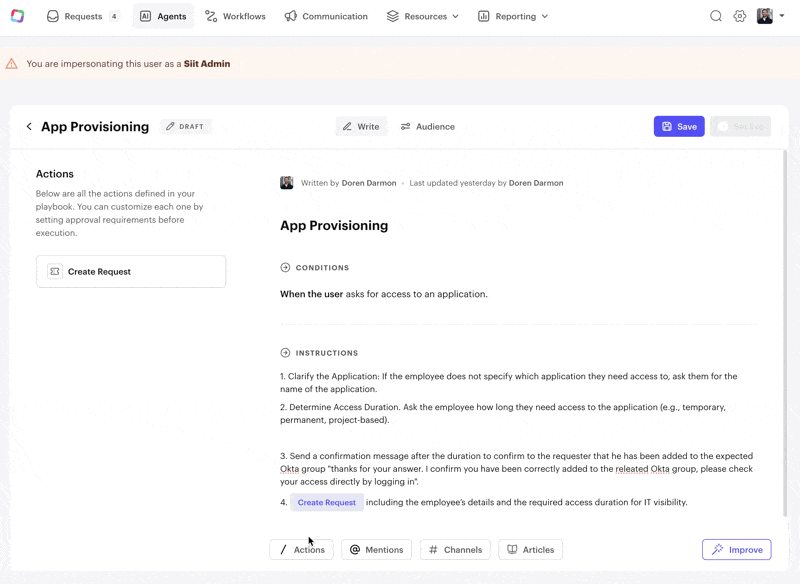
In this example, we want the AI Agent to:
-
Qualify the app name when the employee submits the request (if not already specified).
-
Add the user to the correct group based on the requested app. (You can define naming conventions for groups to help the Agent identify them in your directory.)
-
Inform the requester once the action has been successfully completed.
-
Create a request automatically if any issue occurs during execution, assigning it to the correct IT service for follow-up.
💡 You can be as detailed as needed in your instructions to ensure the Agent has all the context required to execute actions accurately.
⚠️ Make sure to use the /Actions button to insert the proper action in your instructions. Only mentioning the action "add to user to the right group" without using the dynamic action, won't be enough for the Agent to execute.


Once the playbook is saved, test it live!
Want to send an approval request within the playbook?
It's doable! Here is how to do:
In the example below, the Agent executes each instruction defined in the playbook, based on the employee’s request.

App Access Playbooks library


