Overview
As your company grows, you’ll need to give access to more people — IT, HR, Finance, Ops, or team leads — while keeping sensitive information restricted to the right teams.
That’s where Roles and Permissions in Siit come in.
They let you precisely control who can access what, ensuring each admin only sees and manages what’s relevant to them.
This article walks you through how to configure and manage roles based on common use cases — from adding a new admin to creating custom roles for specific needs.
Typical Use Cases
Here are some examples of how companies use Roles and Permissions in Siit to scale safely:
-
HR Teams handle private employee requests (contracts, payroll, onboarding) without exposing sensitive data to IT or Ops.
-
IT Admins manage devices, app access, and workflows, but cannot view HR threads or payroll data.
-
Finance Teams access vendor invoices or expense approvals without seeing tickets from other departments.
-
Team Leads can manage templates, workflows, or dashboards for their own inbox only — without touching global settings.
Adding a New Admin or Owner
Only Admins and Owners need to be explicitly invited to the Siit Admin Console.
Employees are created automatically through your directory sync and can use Slack, Teams, or the Portal without any setup.
To invite a new Admin or Owner:
-
Go to Settings → Roles & Permissions.
-
Click New.
-
Choose a predefined role or create a Custom one.
-
Enter their email address — they’ll receive an invite to log in via SSO.
-
Click Save. Changes apply immediately.
Choosing the Right Role
Here’s a quick guide to help you decide which role fits your user best:
|
Scope |
Role |
Description |
|---|---|---|
|
You want someone to have full control of the workspace, including billing and security |
Owner |
The highest-level role. Reserved for workspace and security owners. |
|
You want full product control without billing rights |
Super Admin |
All features and data access, minus workspace deletion. |
|
You want HR teams to manage HR tickets and workflows privately |
HR Admin |
Access limited to HR inboxes and private HR data. |
|
You want IT teams to manage tools, connectors, and device requests |
IT Admin |
Access to all IT-related features and integrations. |
|
You want Finance teams to track and approve financial requests |
Finance Admin |
Limited to Finance inboxes and reporting. |
|
You want Facilities or Ops teams to manage office-related requests |
Ops Admin |
Access only to Workplace and Operations content. |
|
You want a team lead to supervise a specific inbox or service |
Custom |
You can fine-tune their visibility and permissions. |
Editing or Revoking Access
To modify or remove access:
-
Go to Settings → Roles & Permissions.
-
Select the user whose access you want to change.
-
Choose Update Role or Remove Access.
-
Changes apply instantly — ideal for handling departures or internal transfers.
Example Configurations
Here are some real-world examples of how roles can be configured:
Example 1 — HR Admin
-
Access: HR inboxes and services
-
Permissions: View and edit private requests, manage workflows and templates
-
Restrictions: No access to IT or Finance data
Example 2 — IT Admin
-
Access: All IT inboxes, integrations, workflows, and playbooks
-
Permissions: Manage Okta, Jamf, and MDM connectors
-
Restrictions: Cannot view HR private requests or payroll fields
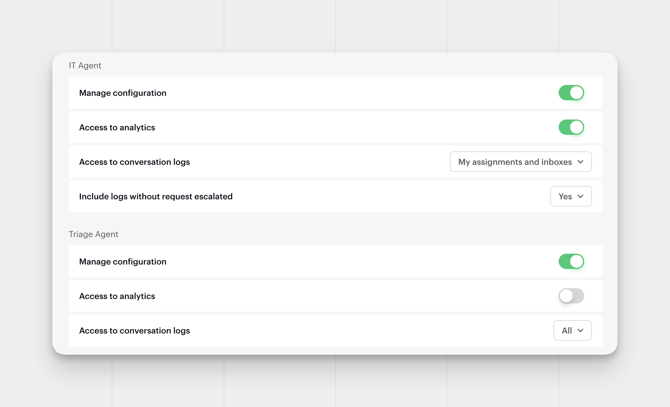
Configuring AI Agent log access
By default, an admin's access to AI Agent conversation logs follows the same scope as their request access so someone limited to "My assignments and inboxes" sees only the agent logs tied to those requests, not the full log history.
To configure this per role:
1. Go to Settings → Roles & Permissions.
2. Select the role you want to edit.
3. Under each agent's section (for example IT Agent or Triage Agent), find Access to conversation logs.
4. Choose the scope:
- All -> see every log for this agent.
- My assignments and inboxes -> see only logs tied to requests this role can already access.
- None -> no access to this agent's logs.
5. If you want the role to also see AI conversations that never turned into a request, set Include logs without request escalated to Yes.
6. Click Save. Changes apply immediately.
Example
An IT reviewer role with My assignments and inboxes access to requests will now see only the IT Agent logs behind those same requests — instead of every IT Agent conversation in the workspace.
Frequently asked questions
Does this change existing roles? No, roles keep their current setting until an admin changes it.
Can I set a different scope for each agent? Yes. Log access is configured per agent, per role, so IT Agent and Triage Agent (and any other agent) can have different scopes on the same role.
What happens to conversations that never became a request? They're excluded by default. Turn on Include logs without request escalated if you want scoped admins to see those too.