Set up Siit SAML SSO with JumpCloud
Follow these steps to quickly set up JumpCloud as the Identity Provider (IdP) for SSO with Siit.
Step 1: Log in to the Siit Admin Dashboard
- Open your browser and log in to the Siit Admin Dashboard.
- Navigate to Settings > Security.
Step 2: Select JumpCloud as the SAML Provider
- Under the SAML Settings section, locate the SAML Provider dropdown.
- Select JumpCloud from the dropdown list.
Step 3: Note the Required Details
- Copy the following values from the Siit Admin Dashboard:
- SSO URL (Consumer URL)
- Audience URI (SP Entity ID)
Step 4: Create the SSO Application in JumpCloud
- Log in to the JumpCloud Admin Portal.
- Go to SSO Applications > Add New Application.
.png?width=670&height=357&name=image2%20(1).png)
3. Search for “SAML” in the search bar.
4. Select the Custom SAML App from the search results.
5. Click Next to proceed.
.png?width=670&height=357&name=image3%20(1).png)
7. Click Save Application.
8. Click Configure Application to begin setting up the app.
.png?width=670&height=358&name=image4%20(1).png)
Step 5: Configure your JumpCloud Application
- In the app settings, click the SSO tab to begin configuration.
- In the IdP Entity ID field, type “JumpCloud.”
- In the SP Entity ID field, paste the Audience URI you copied in Step 3.
- In the ACS URLs field, paste the SSO URL you copied in Step 3.
- (Optional) In the Default RelayState field, define where users should be redirected after an IdP-initiated login. Valid values are:
- employee_portal
- admin_dashboard
.png?width=670&height=357&name=image5%20(1).png)
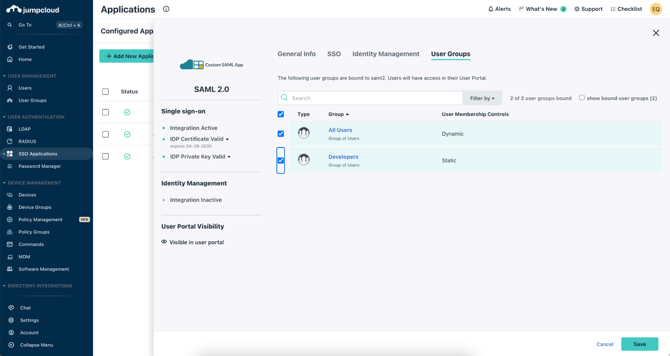
6. Go to the User Groups tab and select the groups that should have access to Siit.
7. Click Save to complete the configuration.
.png?width=670&height=357&name=image6%20(1).png)
8. Open the app and navigate to the SSO tab once more.
9. Click on Copy Metadata URL.
10. Go to the Siit Dashboard and paste the copied URL into the Metadata URL field.
11. Click Save.
.png?width=670&height=357&name=image7%20(1).png)
Step 7: Test SSO
- On the Siit Admin login page, click on Sign in with SSO.
- Enter your email and click Connect.
- After your login credentials are authenticated, you're automatically redirected to Siit.